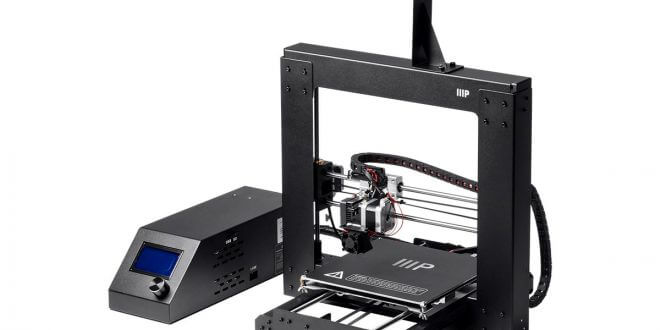
A week or so before Christmas, I purchased a Monoprice Maker Select V2 3D Printer (shown above) on Amazon. At the time, the printer was selling for $320 on Am. It was cheaper elsewhere, but other websites were out of stock. Since purchasing the printer, Amazon has dropped the price down to $299. Such is life…
The Monoprice Maker Select V2 is a licensed copy of the Wanhao I3 Duplicator. It is a tried and tested design that not only boasts a relatively large build volume (200mm x 200mm x 180mm) but also has the ability to print a number of different filament types including nylon (which will likely come in handy for firearm building down the road).
The one downside to this printer is that it does not have an enclosure. For printing in Polylactic Acid (PLA) – the same biodegradable plastic used to make recyclable plastic cups – you don’t really need an enclosure. PLA prints just fine in a room temperature environment. But this plastic is particularly brittle and not intended for high-impact usage.
It is far better to print using Acrylonitrile butadiene styrene (ABS) filament. ABS is the plastic used to make Lego bricks. Anyone who has ever accidentally stepped on a Lego – which is likely everyone who’s ever owned Lego – knows that ABS is plenty strong. It is even harder than PLA but instead of breaking on impact, ABS will bend and flex before breaking. Given the fact that I’m going to be relying on this plastic to contain controlled explosions just inches away from my face, I’d prefer the plastic to “bend” instead of “shattering”
The main problem, however, is that ABS is very prone to warping and shrinkage if it isn’t printed in an optimal environment. You can print in ABS without an enclosure, but the minute someone opens the front door and lets a draft in, your entire print could be ruined. Being a budget printer, the Maker Select V2 does not come with an enclosure.
So before I could venture into 3D printing guns, I needed to build an enclosure for my printer.
In keeping with the 21st Century Gun Project, I relied exclusively on readily available information on the internet and tools at my local hardware store (Lowe’s).
On the internet, there is something known as the upcycle community. People take mundane, basic objects and “upcycle” them into a more important use. Many upcycled designs include Ikea furniture.

For an enclosure, people have had success in repurposing Ikea’s Lack end table (above). This is just a basic square end table that costs around $9.99, but its dimensions are perfect for enclosing many 3D printers. Without the filament spool, the Maker Select V2 fits under a lack table with about an inch to spare.
I ended up buying three of these end tables with the goal of stacking them on top of each other to create a 3D printing station.
Here is the parts breakdown and the estimated cost (before tax) of building the enclosure:
3 ct – Ikea Lack Tables: $29.97
4 ct – Optix 18-in x 24-in Acrylic Sheets: $41.12
18 ct – #10-32 3-in Machine Screws: $9.92
4 ct – #6-32 3/4-in Machine Screws: $1.24
12 ct – #10-32 Wingnuts: $4.96
30 ct – #10-32 Washers: $2.00
4 ct – Steel 1-in L Brackets: $3.18
4 ct – 3/4-in Magnets: $2.83
1 ct – GorillaGlue Wood Glue: $3.98
1 ct – GorillaGlue Super Glue: $3.98
1 ct – 3/4-in Dowel: $0.59
TOTAL: $103.77
I got the acrylic cut at Lowe’s to size (400mm x 447 mm) and sanded them to fit. I was going to use all store-bought brackets but then I thought to myself, where’s the fun in that? So I went into TinkerCad (a free online 3D design tool) and designed and printed my own plastic 1-in L Brackets. I also found a design on Thingiverse for a kitchen cabinet handle, so I 3D printed two of those instead of using the store-bought metal handles.
The three enclosure walls are bolted to brackets, but I opted for a magnetic door design for the front (as opposed to hinges). The Lack Table is mostly hollow, so I was worried about getting the necessary support for a hinge to hold up the door. The magnets are super glued to the Arcylic and attach to the metal brackets to keep the door in place.
Took a day to print the handles and brackets and then about half a day to build the enclosure.
I have plans to add a digital thermometer and PC fan down the road to regulate the interior ambient temperature, but so far the temperature has stayed pretty stable.
For 3D printer filament, I opted to start out with Inland 1.75mm PLA and ABS. There is a MicroCenter located about 3 minutes form my office, so I was able to pick up 1kg spools for just $15. On Amazon, this same filament sells for $17+. So far, I don’t have any complaints about the filament. It is a decent, budget brand.
So all-told, I am in this 3D printing set-up for just under $500. Let’s see what kind of guns we can build…