Today, we took the first real step in our 21st Century Gun Project: 3D printing a 10/22 receiver.
Essentially, this project is an attempt to show how the 21st Century has intertwined the 1st and 2nd Amendments.
With the advent of new technologies allowing for more sophisticated in-home manufacturing and wider access to educational materials, it is impossible to truly implement gun control today – stop citizens from owning a gun – without also violating the 1st Amendment.
Imagine that one day in the future, the Federal government bans a book. Imagine that the contents of this book are determined to be too dangerous for public consumption. Our 1st, 3rd, and 4th Amendment protections would prohibit the government from stationing police in our homes to monitor what we were printing or downloading.
The same goes for 3D printing a 10/22 receiver, or any other gun for that matter. It is impossible to truly prevent an individual from designing and printing a 3-dimensional object in the shape of a gun. And even if it was possible, it would be unconstitutional, just like it would be unconstitutional to dictate what a sculptor should be allowed to sculpt.
That is the background for our project. With minimal resources, anyone can build a firearm in their home. So why make law abiding citizens jump through hoops to own one?
We will be using a Monoprice Maker Select V2 Printer. You can read more about the $300 printer we’re using here.
3D Printing a 10/22 Receiver
When looking at which types of guns to print first, we wanted to start with a .22lr firearm. A smaller round means less recoil, which means less likelihood of catastrophic failure.
Since the Ruger 10/22 is essentially a glorified rectangle, with some exceptions, it seems like the best bet to start with.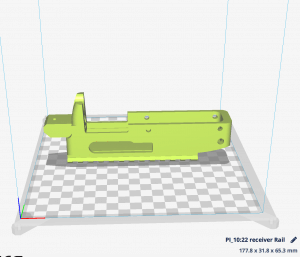
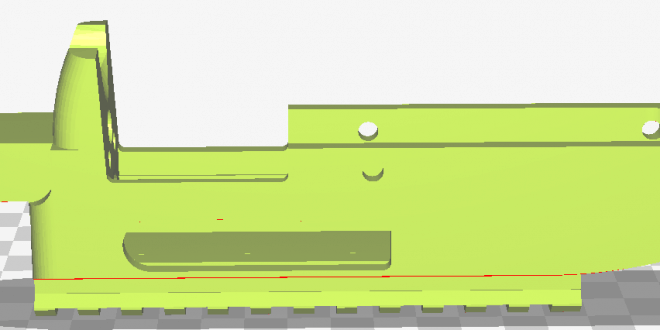
So, we downloaded Fosscad – a 1.2 GB folder full of open source 3D printable gun designs – and chose a railed 10/22 model. Here is what it looks like in Cura, which is 3D printing slicer software.
Finding or creating a 3D model is only the first step. You can’t just send your 3D printer a 3D model (usually saved as an .stl file). In order for the printer to understand what you want it to do with the file, you need to “slice” it. Once you import the 3D design into a slicer program like Cura, you need to input your desired layer height. For this, we used a layer height of 0.1mm.
The software will then slice the model into 0.1mm segments. This receiver design was sliced into 651 layers. One way to think about 3D printing a 10/22 receiver is that it is actually just 2D printing 651-layers on top of one another. The software slices the design into paper-thin layers and then tells the printer the coordinates for the plastic that needs to be extruded at each height.
3D Printing a 10/22 receiver costs $2.04 of plastic and about $2.52 of electricity.
But as you can see, the design includes a number of overhangs, including the ejection port. If you think about 3D printing in terms of layers, there are a number of spots on the design where the printer would try to extrude plastic in mid-air. This won’t work.
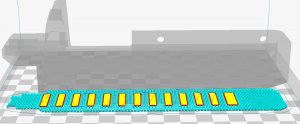 So, we added what is known as “support material. This is shown above in blue. Support material is additional plastic that is added to the design so that when the printer reaches the point where it needs to print an overhang, there will be plastic underneath the extruder to support the extrusion.
Designing support material is always a balancing act, especially when it comes to “support fill rate.” This is the distance between each line of support material. If the support fill rate is high and the lines are close together, your print will come out looking excellent but it will be harder to remove the extra material. If your support fill rate is low, then the lines will be farther apart and will be more prone to failure.
We chose a support fill rate of 45%. This will give our overhangs good, solid support. It might be a little more difficult to remove the supports later, but that shouldn’t be too hard since the design is essentially a rectangle.
For 3D Printing a 10/22 receiver, we’ll be using 1.75 mm Inland Red ABS material. ABS is the same plastic that is used to make Legos. While a Lego firearm might seem terrifying, the plastic is a good choice for experimenting with firearms because it will bend before it breaks and has a higher glass transition temperature, making it suitable for enclosing controlled explosions.
So here are our print settings:
50mm/s print speed, 235°C extruder temperature, 110°C bed temperature, 100% infill, 3mm retraction @ 20mm/s.
Our printer estimates it will take 21 hours to complete, but it will likely take a little longer because the software doesn’t always accurately account for acceleration speed.
The Cura software takes all of the slices, adds in our custom settings, and exports the instructions into a file type known as gcode. We send that .gcode file to the printer and…
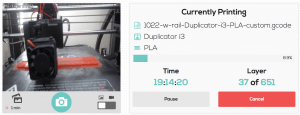
Here we are at the 8.9% point. The printer has printed the Picatinny rails and surrounding support material and is starting to print the roof of the receiver.
The webcam in the 3D printer enclosure is taking a photograph every 1 second, so we’ll be able to put all those pictures into a timelapse video of the machine 3D printing a 10/22 receiver.
If everything goes right (which isn’t a guarantee) , the receiver will be finished tomorrow morning. When it finishes, success or failure, we’ll link to the results.
To be continued…
 Second United
